There is a property one can set on the web application to constrain the results from the people picker to only those users who are members of the current site already. You may want to do this for multi company hosted environments.
The command line is:
Stsadm.exe -o setproperty –url http://server –pn “peoplepicker-onlysearchwithinsitecollection” –pv yes
Friday, May 30, 2008
Tuesday, May 27, 2008
Master Page, CSS Deployment from staging server to Production server using feature
When developer creates files in Publishing site /Team site in a development environment using SharePoint Designer, the files are stored within the site's content database, not on the file system. These types of pages are called "customized" ("unghosted"). While this is fine and good for development, you're going to have some challenges in a real MOSS environment where you'll have developers working on developer machines, a shared development environment, a test environment and a production environment.
Moving this type of files which reside in the content database to different environment can be done by opening each file in development environment in SharePoint designer, copying the contents, creating a new file in your target environment (such as production), paste the contents on the clipboard, save , check- in , publish and approve (in case of Publishing layout). This is a very tedious job if we have more than one file.
Manually copying all customized files from the development server to local file system is very tedious so this process is automated using .NET application. This application reads all master pages and CSS files names from the “ProvisionConfig.xml” so that we can specify which master pages have to be provisioned and copies all the master pages and CSS files into the destination folder specified.
The ProvisionConfig.xml file is shown below:

Once the files are available locally, it has to be updated on the production server. This is done by creating a custom SharePoint feature. “DeploymentFeature” is the custom feature created which is responsible for provisioning the files into the lists and libraries on feature activation. Not only will it provision one file, but it can provision many files at once.
In FeatureActivated event, write the code for updating the master page contents. Checkout the file, update the contents, check in and publish and approve the file programmatically. here is the sample snippet that performs the above mentioned process.
SPList masterPageGallery = site.OpenWeb().Lists["Master Page Gallery"];
// get a handle to the folder we want to upload the file to
SPFile masterFile = masterPageGallery.RootFolder.Files[FileName];
//backup the original file
masterFile.CopyTo(url + filename.Split('.')[0] + "_Original.master", true);
//Check in file
masterFile = masterPageGallery.RootFolder.Files.Add(url + origFile.Name, contents, true);
masterFile.CheckIn("File over-written by activiating the Published Page View Feature");
//Publish the file
masterFile.Publish("File published by activating the Published Page View Feature");
//Approve the file
masterFile.Approve("Approved by Published Page View Feature");
Install the feature and activate the installed feature on the target site.
1. Create a New folder “DeploymentFeature” under the Features directory on web server (production environment) Local Drive:\Program Files\Common Files\Microsoft Shared\web server extensions\12\TEMPLATE\FEATURES
2. Copy all the files (master pages, CSS files) from the local file system to this folder.
3. You are now ready to install the new Feature on the web server. Open a Command Prompt and enter the following:
Change directories to the BIN folder in the 12 hive so you can use STSADM.exe:
cd C:\Program Files\Common Files\Microsoft Shared\web server extensions\12\BIN
Launch STSADM and install the feature:
stsadm -o installfeature -name DeploymentFeature
4. Now we will activate the feature on the site.
Open your site and navigate to the Site Collection Features settings page. Site Actions - Site Settings - Modify All Site Settings - Site Collection Features (under the Site Collection Administration submenu).
The new feature will be listed:
Select Activate
5. The master pages/CSS files are updated.
There are few advantages of using this method:
1. Ability to leverage a rich source control management.
2. Ability to package up the feature (and all its files) in a SharePoint solution.
3. No need for developers to have access to your production environment:
Since the files are in a feature, production administrators can easily install the feature and activate feature on production environment without developers having to open SharePoint Designer to make changes.
4. All files remain ghosted (uncustomized) on the file system:
Since the files are provisioned as Type=GhostableInLibrary which means the content doesn't really reside within the content database, they are on the file system.
Thursday, May 22, 2008
Revealing Unexpected error in MOSS
To enable the details of any specific error message to be viewable on remote machines, please create a tag within a "web.config" configuration file located in the root directory of the current web application. This tag should then have its "mode" attribute set to "On".
When you want all the error messages to be displayed in your custom page, set the file name to defaultRedirect attribute in the tag.
For eg:
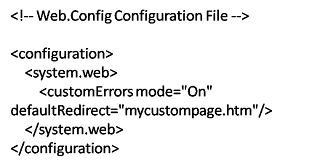
When you want all the error messages to be displayed in your custom page, set the file name to defaultRedirect attribute in the
For eg:

Subscribe to:
Posts (Atom)